Table of Contents
The process of getting text messages on any iOS device is simple, right? You get a text message; the device alerts you with a text sound, a lock-screen text notification, and a vibration. But what happens if you don’t get text message notifications at all?
If you’re facing this problem on your iPhone, you’re probably thinking, why am I not getting text notifications? How do I solve this? Well, that’s what we are going to talk about today. There are several reasons behind not getting any alert sound for an SMS text or iMessage.
It might be a software bug or some misconfigured custom settings. Luckily, there are a number of ways to solve this issue within minutes! Here we will tell you why you might not be getting message alerts and how to solve this issue easily. So let’s dive right in.
In a Hurry? Try Some Basic Steps to Solve Missing Text Notifications Issue
Sometimes you don’t have to go through much trouble to enable text message alerts. Here are a few basic ways of fixing the text tone issue without any trouble –
- Before anything else, try restarting your device; if you’re lucky, this might solve the problem once and for all
- Check out if you have turned on the ‘filter unknown senders’ feature
- Go to settings and make sure the ‘Do Not Disturb’ feature is off
- See if the ‘Deliver Quietly’ feature is turned on
- Take a look at whether you have enabled ‘Hide Alerts’ for a particular message thread
- See if the notifications on your iPhone are stacked together
- Choose a text tone for text messages or change the previously set text tone
- Make sure your device isn’t in a silent mode or the mute switch is turned off
- See if your iPhone is connected to an Apple watch; this might be the reason why your text notification is bypassing the phone and reaching directly to the connected device
- Update your iPhone and other Apple devices
- Check out the date and time settings on your iPhone; choose the ‘Select Automatically’ option
- Examine your BT connections and turn off Bluetooth
- Reset network settings
Methods of Fixing Not Getting Alert Tone for Text Messages on iPhone
Since the situation and the device iOS version is different for each user, the method of fixing the issue will vary from device to device.
We have narrowed down all possible causes of missing text message alerts and provided some simple and quick solutions. So, go through the methods below and check which one works for your device.
Method One – Update Your Device Software
If you’re on iOS 12 or 13, your device might not notify you of incoming text messages. Some iPhone users have also faced issues even after setting repeat alerts. This happens due to software bugs, and you need to get iOS 13.2 or iOS 14.2.1 updates to get rid of this problem.
Here’s the easiest way to update your device –
Step 1
First things first, backup your device as some data might get missing after the update. You can use iCloud to backup all your necessary data. Restart your device if required.
Step 2
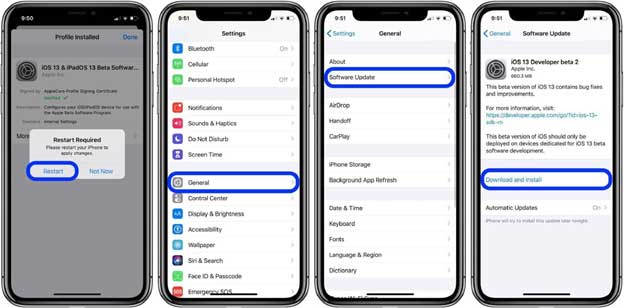
Connect your device to a stable Wifi network. Then go to settings and select ‘General.’
Step 3
Find out the ‘Software Update’ option and tap on it. After that, select ‘Download and Install.’ Follow the instructions given on your screen to update the device successfully.
This might take a while, so make sure you have enough charge on your phone. You can connect it to a power source to avoid unnecessary complications.
After the update, your message notifications will go back to normal. However, in case you don’t have the chance to get the update right at the moment, you have to change the notification banner settings to persistent.
Method Two – Open Your Notification Stacks
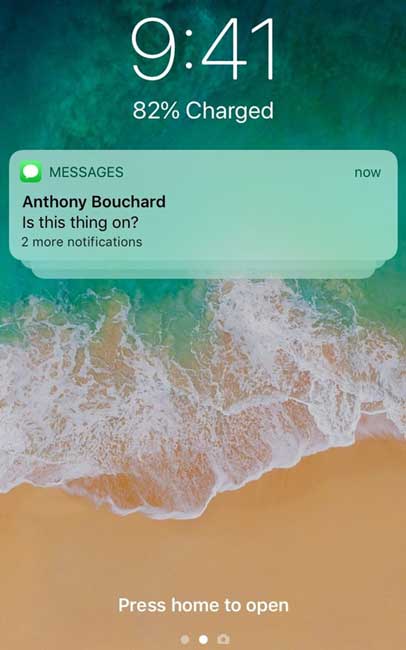
When you’re using an iPhone with iOS 12+, you get the notification grouping feature. It was introduced to avoid the clutter of individual text notifications filling up the lock screen. Due to this feature, all your notifications are bundled together.
So, it’s possible you’re not seeing a message notification because it’s hidden in the notification stack. Thankfully, opening the stack and finding a particular message notification is pretty easy. And here’s how you do it –
Step 1
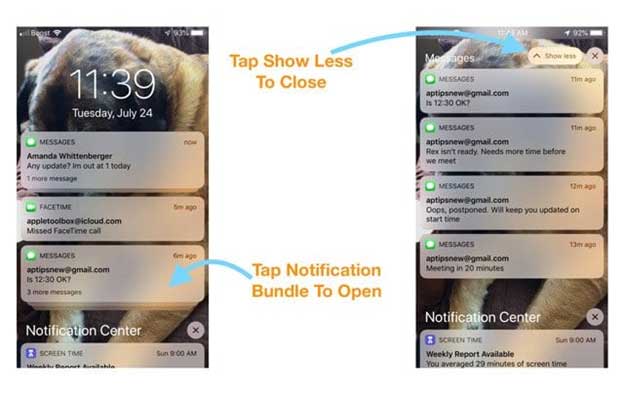
Turn on your lock screen or open the notification center. Now, check out if there are any notification groups. This might look like stacks of papers, and it will tell you how many notifications or messages are stored in the stack.
Step 2
When you tap on the stack, it will expand and reveal all the messages and notifications. You can choose one individual text message that you want to open.
Step 3
On the top right corner of your screen, you’ll see a large X icon. Press on it to clear all the notifications. Or, select the ‘Show Less’ option to re-stack your notifications.
Method Three – Disable ‘Deliver Quietly’
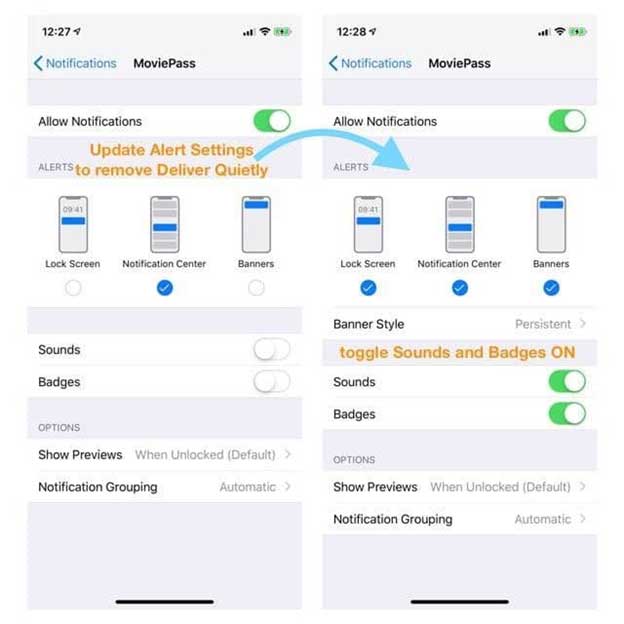
On the latest iOS and iPadOS versions, you can use a feature called ‘Deliver Quietly.’ When you enable this feature, you stop getting sound alerts for text messages and other notifications.
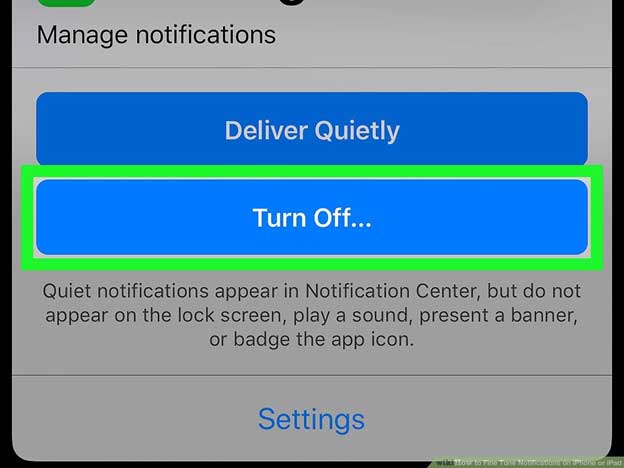
For this, you need to select a particular notification or notification stack and swipe left. There you’ll see the option ‘Manage.’ You can tap on it and choose ‘Deliver Quietly’ to avoid getting sound notifications from that particular app.
All the notifications for that app will appear on the notification center, but you won’t receive alert tones, and it won’t appear on your lock screen. So, if you have set the deliver quietly feature for your message app, you need to disable It for getting notifications for your incoming text messages.
Follow the steps given below to disable the feature-
Step 1
First, go to settings by tapping on the settings icon. Now scroll down and tap on ‘Notifications.’
Step 2
Now, look for the ‘Messages’ app. Is there any ‘Deliver Quietly’ text below its name? If yes, then you need to turn off the feature for this app.
Step 3
Tap on ‘Messages’ and checkmark the options ‘Lock Screen’ and ‘Banners’ to turn on sound alerts for the app.
After that, you have to choose a Banner Style. If the banner style is set to ‘Temporary,’ change it to ‘Persistent.’
Step 4
Turn on the toggle beside the ‘Badges’ option. Then do the same for ‘Sounds’ and choose your preferred alert tone for all your incoming text messages.
Step 5
If you don’t get the text message notification on your lock screen, tap on ‘Show Previews’ and select ‘Always.’
Method Three – Set a New Alert Tone
Sometimes you can fix iPhone text tone issues just by changing your alert tone. In fact, most users who have faced this issue could fix it just by changing the alert tone to default.
Also, people have noticed that most of the time, longer alert tones tend not to notify of text messages for some reason. Follow the steps below to set a new alert tone for your incoming text messages –
Step 1
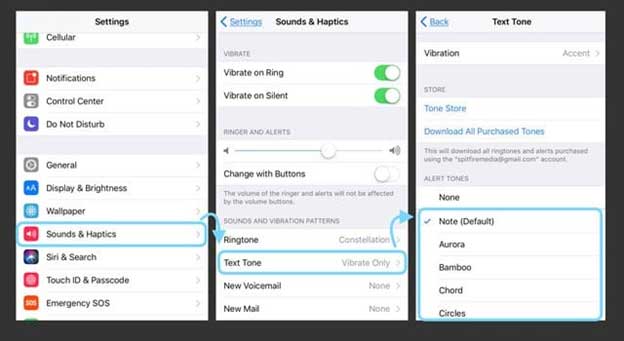
Tap on the Settings icon on your iPhone home screen and go to settings. Then scroll down and select ‘Sounds & Haptics.’
Step 2
Keep scrolling down until you reach the ‘Sounds & Vibration Patterns’ Section. From this section, find out the ‘Text Tone’ option. Tap on it and check if it’s set to ‘Vibrate Only’ or ‘None.’
Step 3
Now, you need to select a new alert tone for your text notifications. You’ll find several text tones there. Tap on any of them, listen to the sound and see if you like it or not. Try to choose a particularly louder alert tone.
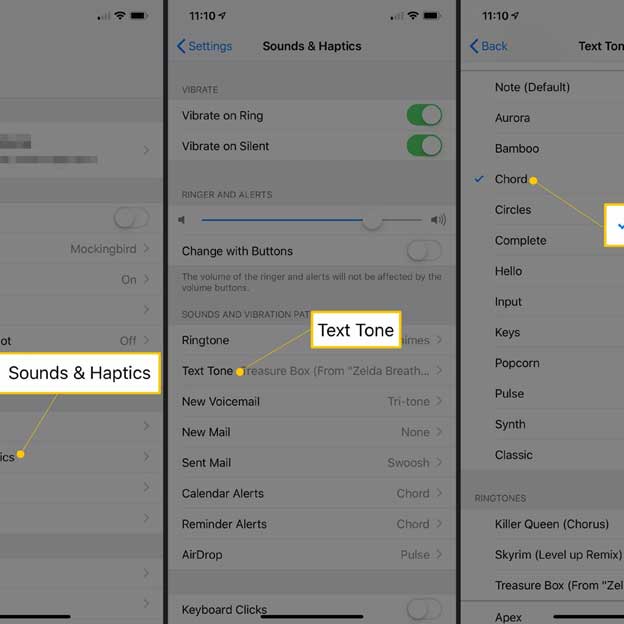
It’s best if you just set it to default. For this, choose the ‘Note (default)’ option and then tap ‘Done’ to successfully set the alert tone.
Method Four – Set Alert Tone for Particular Contacts
It’s possible that you have set the text tone to ‘None’ for a particular person and forgot about it later. If you want to get text notifications when that person messages you, it’s necessary to revert the process and set a new text tone for that person’s contact.
Here’s how to set a text tone for a particular contact –
Step 1
Go to your Contacts or open the Phone app. Look for the contact you want to receive messages from and tap on it.
Step 2
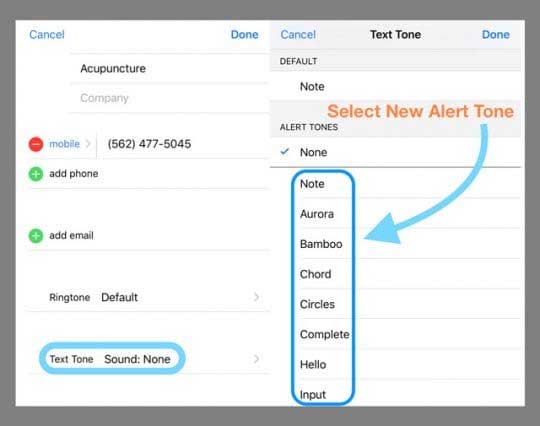
From the top corner of your screen, select ‘Edit.’ Now, scroll down a bit and tap on the ‘Text Tone’ option.
Step 3
If no text tone is selected for that contact, you need to set a new one. From the list of the text alerts, select your preferred one and tap on ‘Done.’ And that’s it! From now on, you’ll receive a text message sound every time you receive a message from that contact.
Method Five – Verify the Date and Time on Your Device
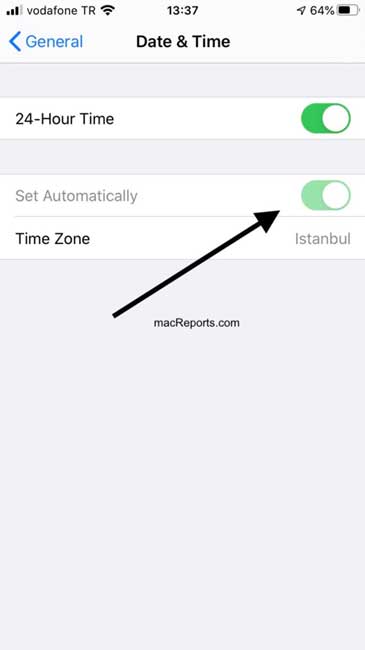
Typically, the date and time settings for most iOS devices are set automatically. If you have changed the settings and set your device’s date and time manually, it’s possible that you have got the date or time wrong.
In that case, your messages won’t load properly, and the alert sounds will be delayed for a new message. So, let’s check out how to set the correct date and time on your device.
Step 1
From your iPhone home screen, go to settings. Then tap on ‘General.’
Step 2
Tap on the ‘Date and Time’ option and slide the toggle beside ‘Set Automatically.’ If it’s already turned on, turn it off, and wait for a few seconds before turning it back on.
Method Six – Reset Your Network Settings
The network settings of your device have a connection to the message server. Sometimes refreshing the network settings can fix text alerts. Now, this process won’t delete most of your necessary data like documents, photos, and videos.
But, you have to note down your passwords, Wifi-related data and touch ID as you have to re-enter them after the refreshing process is done.
Follow the steps given below to reset the network settings –
Step 1
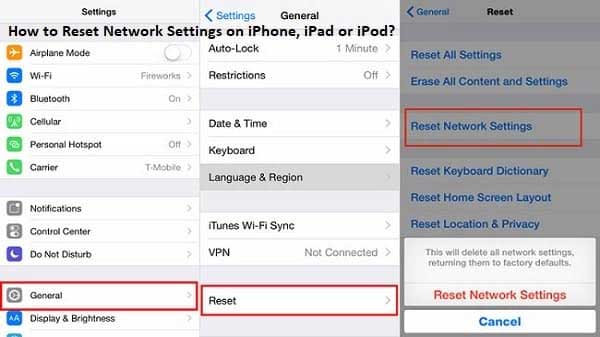
Open the Settings app and go to ‘General.’
Step 2
From the top of the page, select ‘Reset.’ Then tap on the ‘Reset Network Settings’ option.
Step 3
Instead, you can also choose the ‘Reset All Settings’ option. However, this might impact your phone passwords and lock screen settings.
Method Seven – Disable the ‘Filter Unknown Senders’ Feature on the Messages App
Have you ever turned on the Filter Unknown Senders feature on your messages app? Then you might be missing out on text notifications because your device is filtering unknown senders.
This feature will automatically turn off sound notifications for a text message from people who aren’t in your contacts list. Here’s how you disable the feature –
Step 1
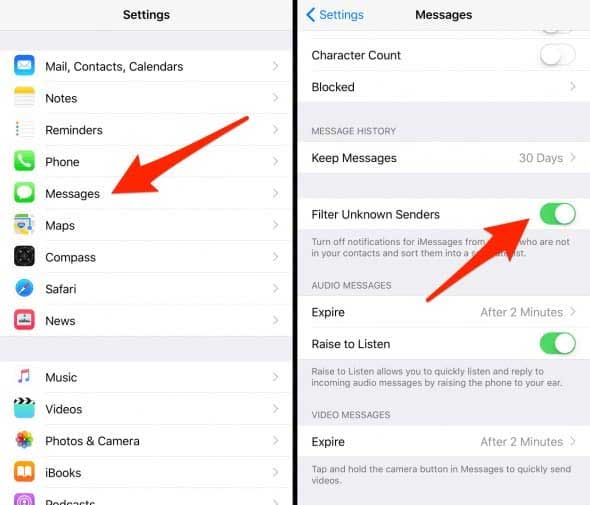
Go to settings and select ‘Messages.’
Step 2
Scroll down and find out ‘Filter Unknown Senders.’
Step 3
If the toggle next to the option is turned on, slide it to the left to turn it off. And your job is done! You won’t be missing text notifications from folks and businesses anymore.
Method Eight – Check Out Your Blocked Contacts
You know how the blocking thing works on your iPhone. When you block contact or an unknown phone number, the person will still be able to send you texts, but you won’t receive them on your device.
If you have blocked someone on the Phone app, FaceTime, iMessage, or Mail app, the block will remain active until you unblock them. So, let’s see how you can unblock a person to get text message sounds when they message you –
Step 1
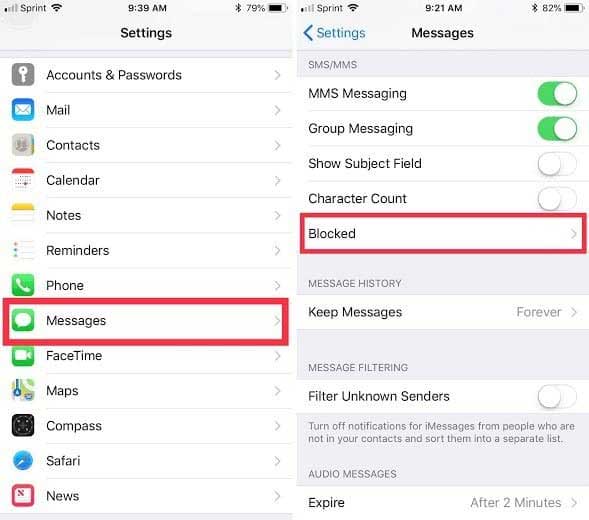
Go to settings and select ‘Messages.’ Then look for the SMS/MMS section.
Step 2
While you’re on this section, tap ‘Blocked Contacts.’ You’ll see all the contacts and phone numbers you have blocked previously.
Step 3
To remove a contact or number from the block list, tap on it and swipe left or right.
If you want to unblock someone from the Phone app, FaceTime, or Mail app, follow the instructions below –
Go to settings and select ‘Phone.’ Then select ‘Call Silencing and Blocked Contacts.’ Tap on the ‘Blocked Contacts’ option, and you’ll see the list of contacts you have blocked.
Go to settings and select ‘FaceTime.’ Under the ‘Calls’ section, you’ll see the ‘Blocked Contacts’ Option. Tap on it to get a list of previously blocked contacts.
Go to settings and select ‘Mail.’ Tap on the ‘Threading’ option and select ‘Blocked.’
Method Nine – Update Notification Banners
Some iPhone users have reported that they receive the text notification, but it disappears after a few seconds. This can happen due to the notification banners settings.
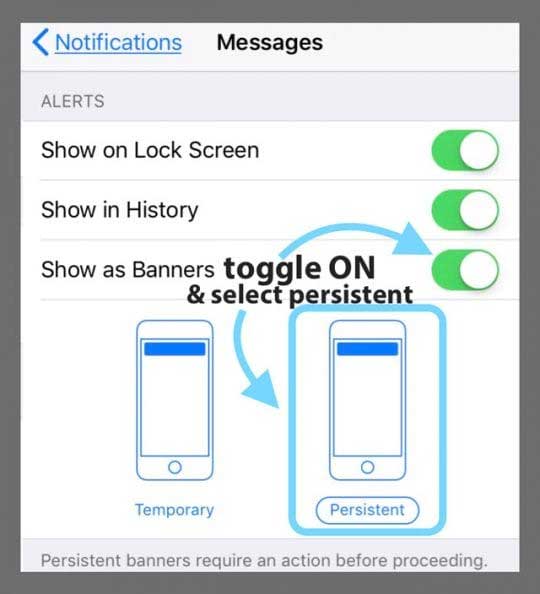
If it’s set to ‘Temporary,’ the text will disappear after a short while. You need to set it to ‘Permanent’ so that you can take action before it goes away. So, let’s see how to change notification banners on iPhones –
Step 1
From your home screen, open Settings. Select the ‘Notifications’ option.
Step 2
Now, tap on ‘Messages.’ On the new page, you’ll see several options, including ‘Show as Banners.’
Step 3
Just below this option, there will be two icons. Select the icon for the ‘Persistent’ option. The word ‘Persistent’ will be circled as a sign of confirmation.
Method Ten – Disable Do Not Disturb
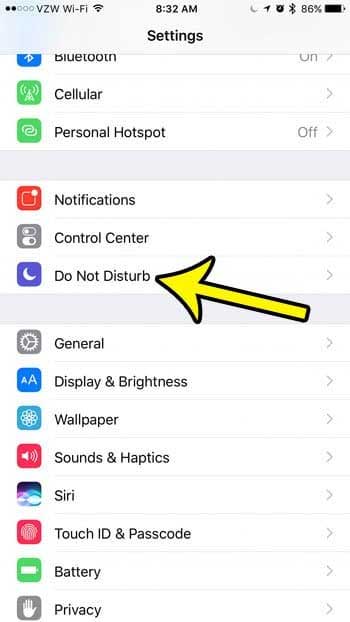
Enabling the Do Not Disturb feature can be another reason why you’re not getting text notifications. To check whether it’s turned on or not, open Settings on your phone and go to ‘Do Not Disturb.’ If the toggle beside the text is turned on, slide it to the left to set it off.
You can also swipe from the middle of your screen to open the control center. There you’ll see a crescent moon icon. If it’s highlighted, this means Do Not Disturb is turned on. Tap on the icon to turn it off.
Method Eleven – Disable Silent Notification While Driving
Apple has introduced a new handy feature for iOS 11 or above. It silences all types of notifications and keeps your lock screen dark while you’re driving.
If you want to receive a text message sound even when you’re driving, you need to turn this feature off. And here’s how you do it –
Step 1
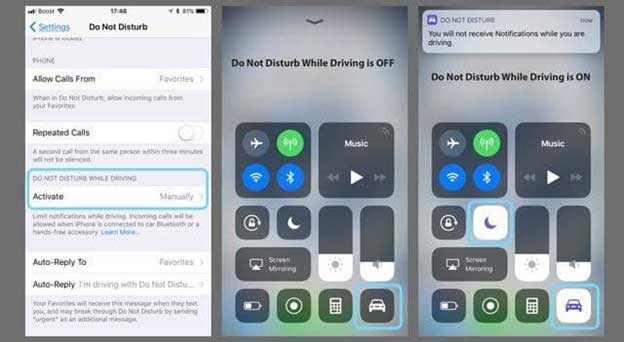
Open your Settings and select ‘Do Not Disturb.’ Tap on ‘Do Not Disturb While Driving.’
Step 2
Now, you have three options to choose from: Automatically, Manually, and While Connected to Bluetooth. If it’s set to ‘Automatically,’ the do not disturb mode will be enabled on motion, whether you’re the driver or passenger.
Step 3
So, you need to choose the ‘Manually’ option. This way, you can turn the feature on or off whenever you want. While driving, you can open the control center and tap on the car icon to turn on the do not disturb mode.
Method Twelve – Disable ‘Hide Alerts’ for Specific Contacts
If you’re not getting text notifications for one or just a few contacts only, then you need to check whether you have turned on the Do Not Disturb feature for some of the contacts.
For this, open all your message threads and see if there’s any crescent moon icon right next to a specific contact. In some cases, the ‘Hide Alerts’ mode is activated instead of DND.
You have to deactivate it to receive text notification sounds for a new message. The process includes the following steps –
Step 1
Go to the Messages app and open the conversation thread of the contact you’re missing notifications from.
Step 2
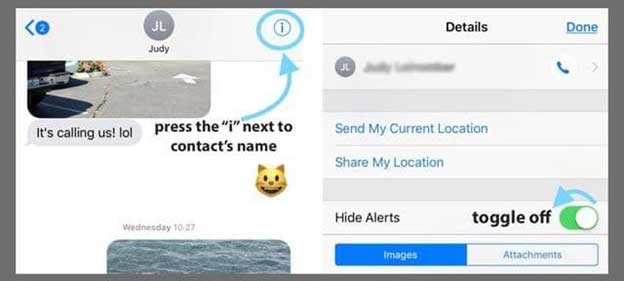
Tap on the person’s name from the top of your screen. Press the ‘i’ icon to get editing options for that contact.
Step 3
Now, toggle off ‘Hide Alerts’ or ‘Do Not Disturb,’ and your job is done.
Method Thirteen – Turn Off Bluetooth Connection
When you connect your phone to a Bluetooth device, sometimes the connection remains, and all your notification alerts go to the Bluetooth device. To disconnect the device, go to the Settings app and tap on ‘Bluetooth.’
If any Bluetooth device is connected to your iPhone, disconnect it or unpair the device. In case you see there are no Bluetooth devices, you can just turn off the Bluetooth.
For this, open the control center by swiping up from your home screen. Then go to settings and select ‘Bluetooth.’ After that, a simple tap on the ‘Off’ option to disconnect Bluetooth.
Method Fourteen – Unpair Other Apple Devices
You can always pair your iPhone with other Apple devices. And sometimes, your notifications are routed to that device, and you don’t get any alert tones on your iPhone. So, if you have paired your phone with an Apple watch or some other device, unpair it to get notifications on your phone.
If you have enabled the messages app on your Mac, it might block notifications from going to your iPhone. To get rid of this issue, follow the steps given below –
Step 1
From your Mac, open the Messages app. Now, locate the ‘Messages’ option and select ‘Preferences.’
Step 2
Now, do you see the option ‘Enable this account’? Click on the checkbox next to it.
Step 3
Click on ‘Done.’ This will deactivate the messages app for your Mac, and you won’t be able to send or receive any new message on it.
Method Fifteen – Check on the Mute Switch
In most iDevices, there’s a switch on the side to mute audio. Check on the mute button whether it’s turned on or off. If the button is orange, it’s on. This means you won’t receive any sound notifications for your incoming messages and calls. Instead, your device will vibrate when the switch is on.
You need to turn this button off to receive an alert tone for all your text messages. Simply check the side of your iPhone and toggle off the Ring/Volume button. And this will set the switch off.
Also, you need to check if you have accidentally put the phone on silent mode. The easiest way to check this is by using the control center. Open the control center and locate the Bell icon.
It will be highlighted, and you’ll see a line going through it if the silent mode is turned ON. To disable it, simply tap on the bell icon, and you’ll receive notifications for all your texts.

Method Sixteen – Verify Your Notification Settings
Maybe the notification alert on your device is turned off for some reason. It will prevent all types of alerts, including text messages and iMessages. Here’s how you can check it –
Step 1
Go to your Settings and scroll down to locate the option ‘Notifications.’ Tap on it and select ‘Messages’ from the new page.
Step 2
Now, you’ll see a toggle bar next to ‘Allow Notifications.’ Turn on the toggle and proceed to the next step.
Step 3
You have to choose a new alert sound. While you’re on the Settings app, go to ‘Sounds’ and tap on ‘Text Tones.’ Pick a suitable tone for all your incoming messages, and that’s all you have to do.
If you’re using an older iOS version, the process will be slightly different. First, go to Settings and tap on ‘Notifications.’ Next, Choose the ‘Messages’ option and tap on ‘Show in Notification Center’ to turn it Off.
After that, restart your device and turn it back ON. This should do the trick for you.
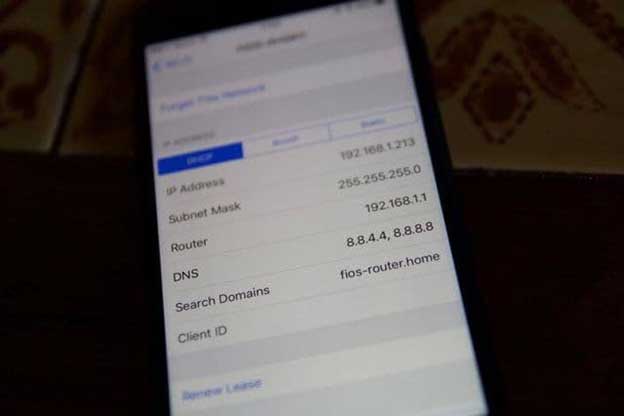
Method Seventeen – Update the DNS Servers
Updating your DNS servers from a local ISP to Public DNS might bring back the alerts and notifications. But before you proceed, write down the numbers related to your DNS servers so that you can get them when needed.
Here’s the step-by-step process of changing your DNS servers –
Step 1
Go to your Settings and select ‘Wifi.’ Then tap on the name of your current network.
Step 2
Now choose ‘Configure DNS’ and then tap on ‘Manual.’
Step 3
Select the ‘Add Server’ option and type ‘ 8.8.8.8 and 8.8.4.4’. After that, tap on ‘Save,’ and you’re done!
Method Eighteen – Switch Device Network
Sometimes switching between your network connectivity jump-starts the device and brings back the notification alerts. So, if you’re using a Wifi network, turn it off and connect using your cellular data. And do the same for your cellular data.
Turn it off and switch to a wifi connection to see whether it brings back the notifications or not.
Method Nineteen – Restart Your Device
If none of the tricks worked for your device, try restarting it. Press the power button of your device and slide it off. Then turn it back on as usual. In case this doesn’t work, you need to go for a forced restart. Here’s the process –
- For your iPhone 6S, press the Power and Home button together and wait for the Apple logo to appear.
- On an iPhone 7, press the Volume Down and Side button and hold until the Apple logo appears.
- For iPhone 8 or above, press and release the device’s Volume Up button. Do the same for your Volume Down button. Lastly, press the Side or Top button and hold until the Apple logo appears on the screen.
Wrapping Up!
So, there you have it all. If you ever find yourself questioning – why am I not getting text notifications and how to fix this issue, you know where to find the answers. We have described all the possible causes and solutions for fixing the no text notifications alert issue.
If one method doesn’t work for your device, jump to the next one, and it might do the trick. Remember that you can always contact Apple support and visit their official website for all your queries.


More Stories
Will Crypto-Based E-Commerce Destroy the Dinosaur-Style Banking Industry?
Getting Started With Crypto
Everything You Need to Know About Davenport Laroche